Crimping My Style

We have finally arrived at telling you about installing our water supply lines.

Amanda spent a lot of time beforehand figuring out exactly what supplies we needed. She ordered most of the PEX, the manifold, and all of the fittings, with a few extras so that we wouldn’t have to run out to Lowe’s, from an online plumbing store. When everything arrived, she counted it all, which maybe seemed a tiny bit obsessive but turned out to be a good move, since the bag of 100 3/8-inch crimp rings we ordered only contained 55 of them. (The company quickly sent us 45 more.)

IMG_5515

Unfortunately, we didn’t think to sort our supplies so nicely until after we had done the bulk of the work.

For the most part, running the actual water lines was as we expected – not too painful, and sort of fun. Each one was like a puzzle: How can I get this unbroken length of pipe from down here in the basement up two floors to the master bath sink, without it going right through the middle of the open floor plan of the kitchen, and without drilling through a laminated beam? For hot water lines, finding the shortest route is especially important in order to minimize water lost at the tap while waiting for all the lukewarm or cold water to flush out of the hot line.

IMG_5464

This was totally safe. Totally.

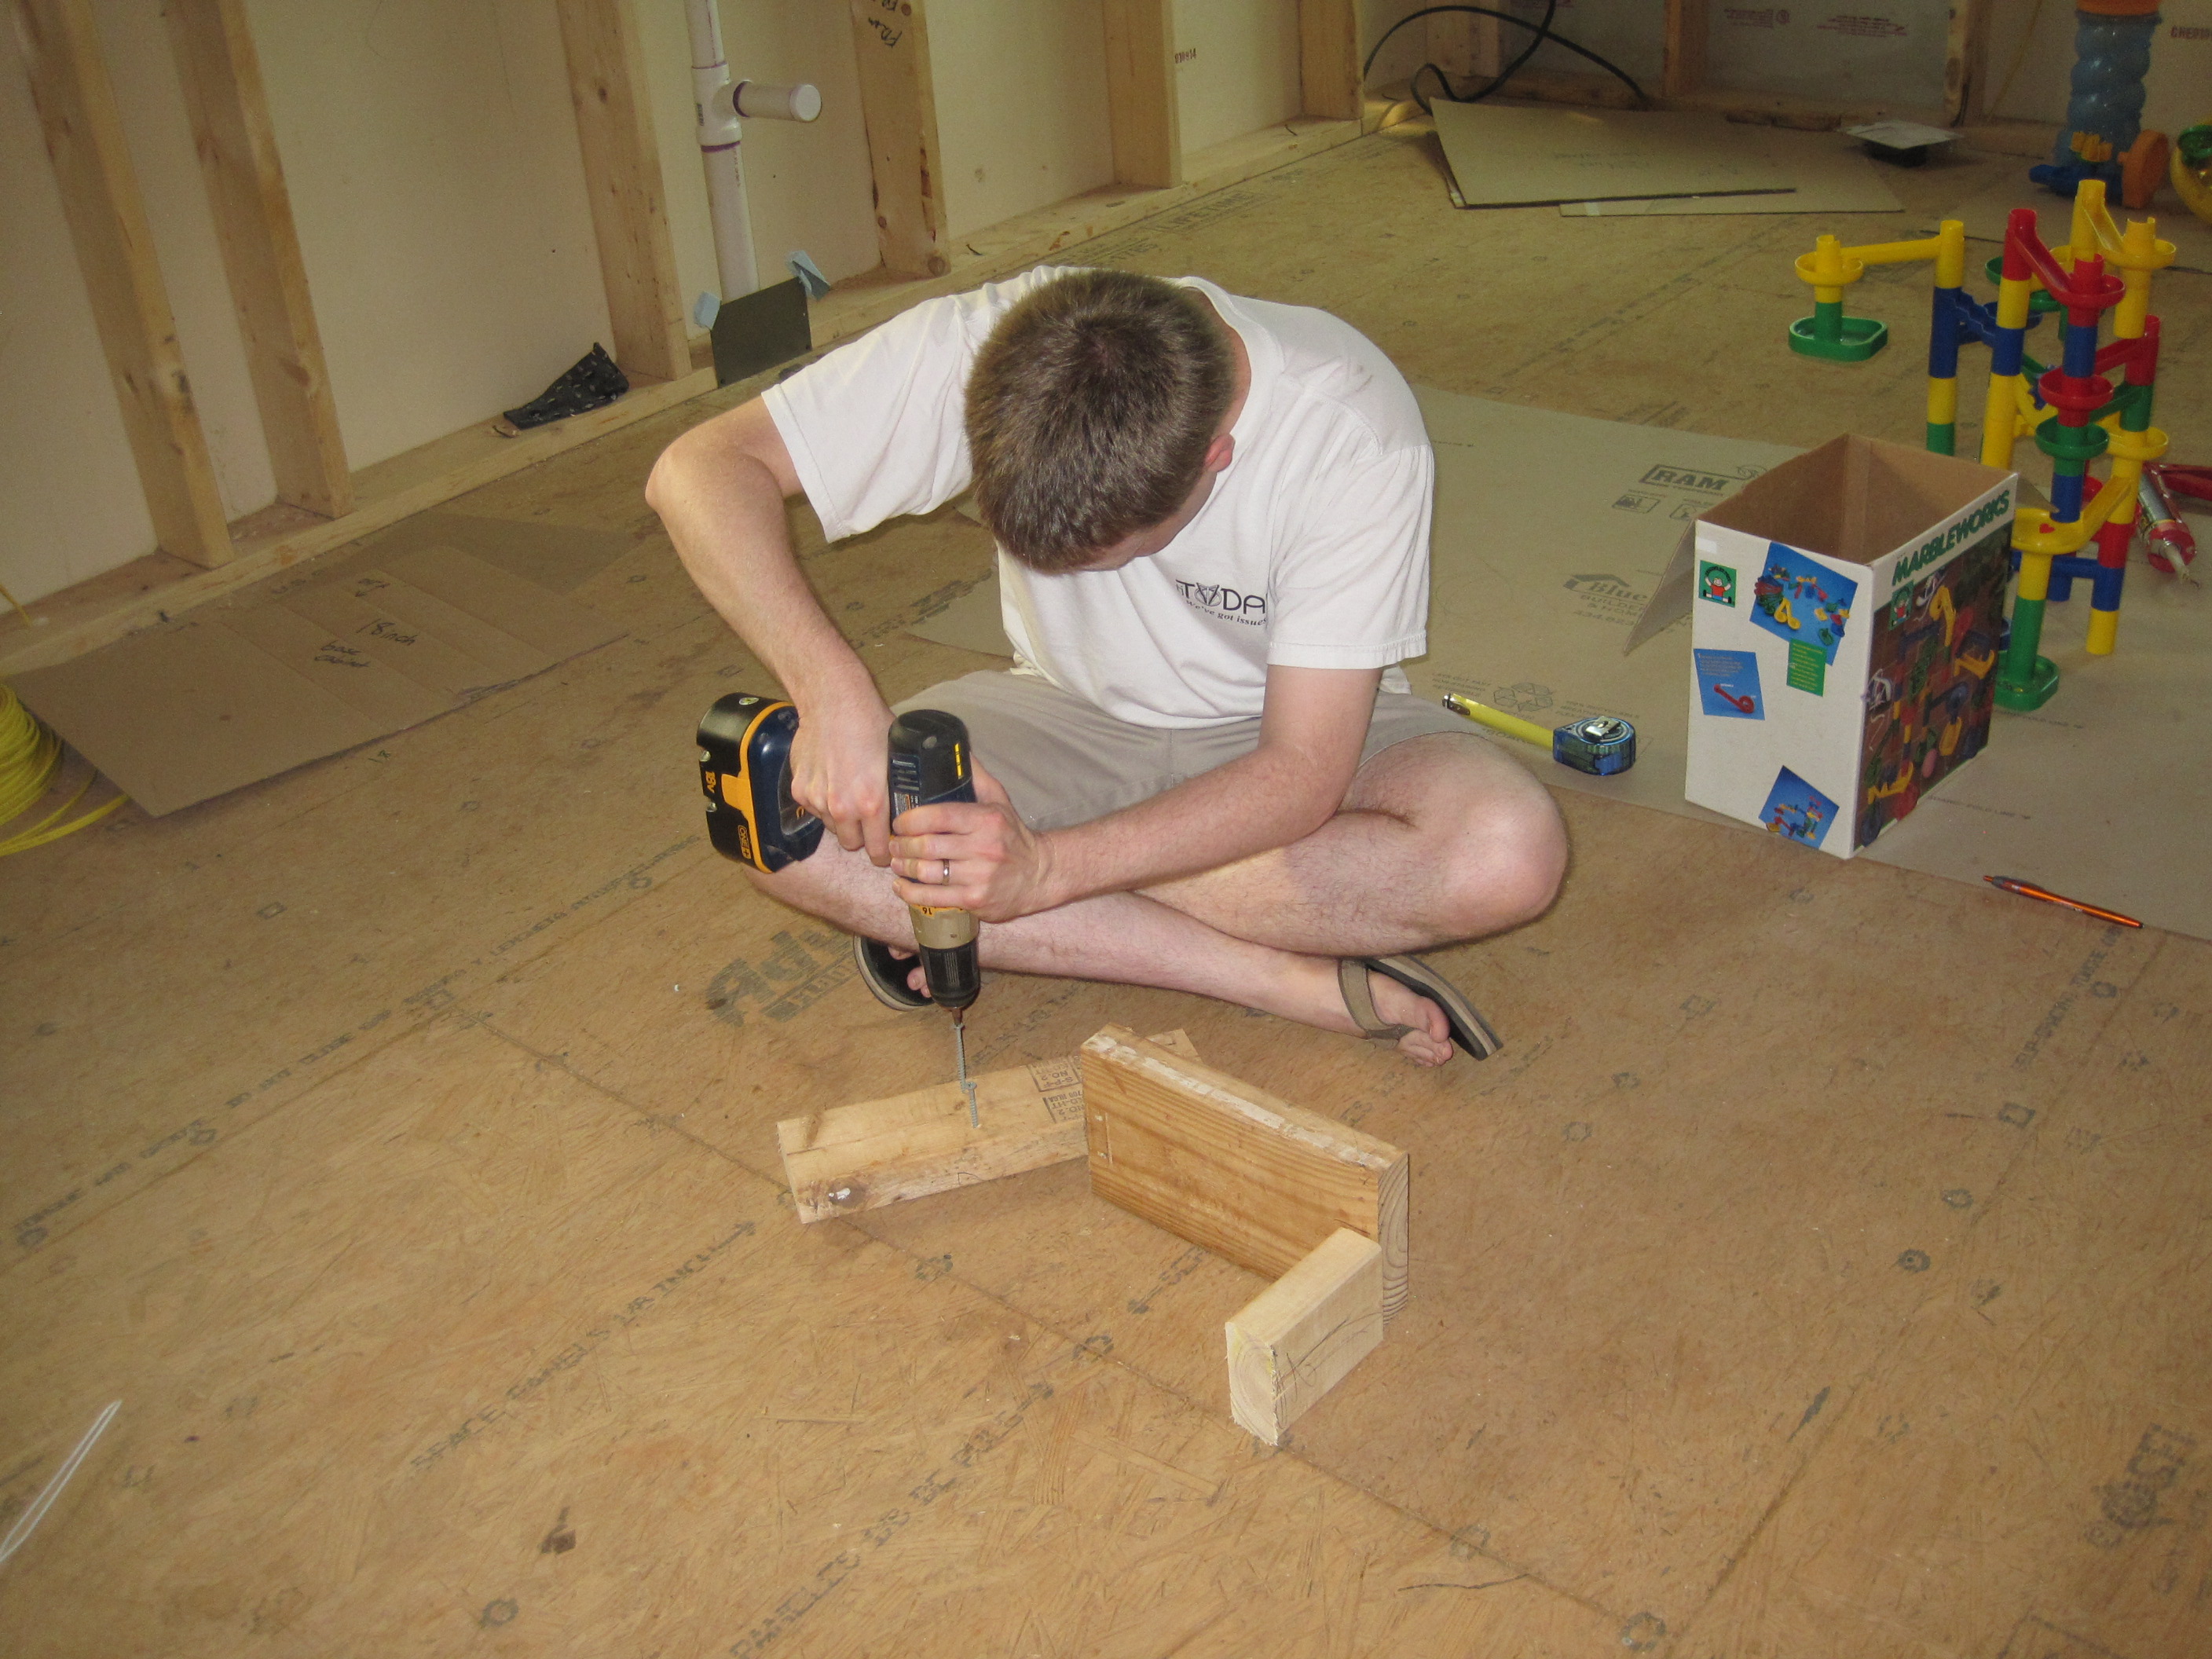
Running PEX means you have to drill a lot of holes. It helps if you have wood-boring drill bits (Irwin Speedbor is one brand). The line to the hose spigot was especially “hole-y,” since the two options for routing it were to go through the exterior wall (and thus through each stud) or through the basement ceiling (and thus through each joist) to the back of the house.

IMG_5455

Helping to pull our first set of pipes through the floor.

As we have noted, the beauty of using the manifold is that you use one continuous length of pipe for each fixture, running it from the manifold to the fixture. This mostly eliminates fittings (elbows and tees and such). You do have to connect the PEX at either end, and to do that, we used crimp rings and a crimp tool. The crimp rings are made of copper and are sized to the PEX; since we had three different sizes of PEX, we had three different sizes of crimp rings. The crimp tool that we bought is adjustable so that it can be used for all three sizes. Because we have to pass our rough-in inspection before we attach fixtures, we’re putting a test plug in the end of each pipe and crimping it. When it’s time to add fixtures, we will cut off the end of the pipe containing the test plug and attach the pipe to the fixture with a crimp ring.

IMG_5457

For each pipe, we had to slide the crimp ring over the pipe, then insert the plug. We had to adjust the crimp ring to be the right distance from the end of the pipe and then crimp it. The trouble was that the crimp ring slides around while you’re trying to get the crimp tool in position. There were a couple of times when we had to use the Dremel to remove a crimp ring, or when we just had to cut the PEX and try again. Oh, and squeezing the crimp tool occasionally took all four of our arms.

IMG_5459

Some of our fixtures need the PEX to come out of the wall, so we attached bend supports to give them the angle they needed, instead of having to cut the PEX and use an elbow fitting to create a 90 degree angle.

IMG_5456

The black things are the supports.

After several pipes had been run, it started to get a little crazy at the manifold. The pipes were everywhere. It often felt like you were being attacked by pipes while standing at the manifold trying to attach one. They also got a little tangled amongst themselves, but we were glad that we were using color-coded pipes so that we would know which was which. Amanda used some zip ties to clean things up a little bit so that it wouldn’t look quite as much like Medusa.

IMG_5467

IMG_5470

IMG_6072

How they look today.

We made sure to attach each pipe to the manifold as soon as we were done running it through the walls so that we wouldn’t forget where it went at the other end. The manifold comes with labels so that you know which pipe is which.

IMG_6074

We aren’t quite finished with the supply lines. We have one or two more things to connect and our exterior hose connection to figure out. We also need to connect it all to our new water heater. But soon. Soon the supply lines will be ready for the rough-in inspection.

Manifold Destiny

Now that you know all about manifolds, we can explain why it took us two hours just to get ours mounted to the wall.

The first problem was the same sort of catch-22 we have encountered several times during construction. Completing water lines (and thus the manifold) is necessary before the rough-in inspection. And the rough-in inspection has to happen before drywall is installed, since much of the electrical, plumbing, and mechanical work will be behind the walls. But in our case, the manifold needed to be mounted on the wall.

Can’t a manifold go inside the wall, with an access panel over it, you ask? Indeed it can. But let’s back up. The manifold was to be located in the mechanical room. I suppose we could have tried to put it in the kitchen or someplace else, but the mechanical room is reasonably centrally located as far as water is concerned, and it’s where the water heater is. The mechanical room also has an exterior wall, and it’s not a great idea to put a manifold inside an exterior wall because of the increased chance of freezing. None of the remaining three walls were great options, either. We ended up deciding to put the manifold on the wall between the exterior wall and the cellar door. It wasn’t quite wide enough according to the instructions, but it was close to the water heater.

IMG_5449

To get around the drywall issue, we made a rectangular plywood backer, mounted it to the studs, and mounted the manifold on it. The drywall, if we ever make it to that stage, will just butt up against the plywood.

So after two hours, we were on to the really complicated part: figuring out how to properly support the 24 water lines after they leave the manifold. The lines can bend, but the manifold manufacturer says to send them straight out of the manifold and through a support before a bend, to avoid putting bending stress on the manifold fittings – the whole thing is just a giant piece of breakable plastic, after all.

IMG_5451

If you mount the manifold inside a wall and have plenty of room, you can drill holes in the nearby studs to support the water lines. Doing it the way we did, there were two options: (1) mount a 2×4 on the face of the wall like a stud that forgot to get behind the drywall, and then drill holes in it to support the water lines, or (2) mount a 2×4 flat on the face of the wall and put clamps on it where each water line passes by. We couldn’t really decide which to do, so we went with option 1 on the left and option 2 on the right.

IMG_5453

Option 1 requires more drilling, and Option 2 requires more clamps.

In hindsight, I think I would have told myself to go with option 2 on both sides. The first problem with Option 1 was that in order to properly locate the holes for drilling, we mounted the manifold, then the 2×4, and then marked and drilled the holes — towards the manifold. Despite my best efforts, this resulted in several fittings being mangled when the drill got stuck in the 2×4, then crashed through it and rammed into the much softer plastic of the manifold. (We avoided connecting anything to the worst of these fittings, and I used a Dremel to smooth down the burrs on the others… we’ll see if it leaks.) We should have taken the 2×4 back down to drill the holes, but I was doubtful I could get it back in exactly the same spot. [Note from Amanda: Or we should have listened to our wife who wanted to drill the holes before mounting the 2×4, even if Peter didn’t think that they would line up right.]

The second problem with Option 1 came later, as we were hooking up the lines to the manifold. For fittings where we needed to attach a line but the positions above and below already had lines attached, it was impossible to fit the jaws of the crimp tool around the fitting. After much frustration, we eventually figured out a workaround: unscrew the fitting from the manifold, crimp it in the air, and slide it back into place. This was also a problem with Option 2, but Option 1 made the workaround a bit trickier.

Next time: the actual installation of the pipes.

Supply Lines: A Primer

Raise your hand if you’ve heard of a PEX manifold.

manifold

We hadn’t either, really, until we started thinking about whether to have a plumber do everything or just the waste lines. We learned that PEX (a.k.a. cross-linked polyethylene), a flexible plastic used for water pipes, was substantially easier to work with than copper or rigid plastic pipes. One advantage is due to its flexibility: instead of adding lots of elbows, each of which consists of two joints, which are opportunities for you to screw up a connection and cause a leak, you can just bend a long length of PEX around many obstacles. It’s also way easier to cut than metal, although a dedicated PEX cutter helps make cuts smooth and straight. You can get red pipes for hot, blue pipes for cold, and white pipes for whatever you want (although Jonah insists the white pipes carry warm water). This is a special advantage if, like us, you demonstrate that you are a True Patriot by installing some red, white, and blue pipes on the 4th of July.

IMG_5980

Another advantage is that attaching fittings requires no heat or soldering. There are a few different types of fittings, but we chose to buy a crimp tool and copper crimp rings. As long as you get the ring and tool around the pipe and fitting in the right spot, and as long as you have herculean arm strength, the tool squeezes the copper ring just the right amount to compress the PEX around the fitting inside it to make a water-tight seal. You slide a little doohickey called a go-no-go gauge over the fitting to see if it is too compressed, not compressed enough, or just right.

IMG_5976

Go-No-Go

As with elbows and other fittings, tees where one pipe branches into two are another place where things can go wrong. The manifold eliminates tees. Or rather, it combines 24 tees (or other amounts, depending on the version you get) all in one spot, so if you screw up, it’s probably right there where it’s easy to access rather than buried in a wall someplace. It’s like an electrical panel for water: you run a single cold pipe and a single hot pipe to the manifold. It then has a fitting for everything else that gets water. Because plumbing is All-American, the manifold operates on the baseball analogy of a home run: Leaving the manifold, each pipe can run all the way to a single fixture with no joints in between.

Manifold advantages: As mentioned above, lower potential for leaks in between the manifold and the fixture. Since each pipe only goes one place, smaller pipe diameters can be used, which is good for hot water, since there’s less of it to flush out of the line before the actual hot water comes out. The manifold has a shutoff for each line, so you don’t have to install a shutoff at each fixture (check local codes, of course).

IMG_5978

Individual shutoffs

Disadvantages: The manifold costs money (ours was about $180), and you have to buy and run more pipes (which are relatively cheap). This gets a bit crazy-looking at the manifold. You have to find a place to mount it. And since the sink and the shower are on separate lines, you no longer get to count on immediate hot water in the shower just because the water got warm while you were washing your hands.

IMG_5468

Pipes everywhere and we were just getting started!

So now you’re an expert too. We bought several coils of PEX in different colors and diameters, a crimp tool, a manifold, assorted crimp rings and fittings, and a bunch of support clamps. Next: A summary of what we actually did.

Oops! My bad.

Once upon a time, a man and a woman owned a Pink House. They needed to mount an exhaust fan in their new half bathroom and it required some extra boards in order to attach it to the joists correctly and in the center of the room. One Saturday in June they decided to attempt this task, even though the man does not like attaching two pieces of wood together, whether by nail or screw, and the woman has no real carpentry skills to speak of. They began their work and then the woman made a critical error…

We had the exhaust fan in our hands, so we started by thinking about what we needed to build in order to mount the fan just right. We held the fan up to the joists and positioned it, we measured how long each board would need to be, we drew a plan, we thought about which way we would like to run the duct to send the exhaust outside, we spent a lot of time thinking.

IMG_5239

We are not architects.

We gathered tools and Peter cut some 2x4s to the appropriate lengths. He worked very hard on attaching all of the boards together just right.

IMG_5238

Dual flashbacks to Peter’s childhood: tjTODAY t-shirt and Marbleworks.

There was a lot of frustration on Peter’s part, but Jonah offered to help.

IMG_5243

At one point, it had to be taken apart and redone because we forgot to account for the width of the boards themselves. He finally had all the boards together and I think he felt pretty good about actually building this contraption exactly to our measurements.

IMG_5245

Then it was time to attach it to the joists. This meant more screwing of boards together, but he managed.

IMG_5246

It fit well and we were pleased with the results, even though it had taken a long time to make it. So Peter was ready to mount the housing of the exhaust fan. He held it up there and realized that the place where the duct would come out was facing the wrong direction. Meaning everything he had just done was not going to work. Oops.

IMG_5248

Um. That was my fault. During our thinking time, we had each taken turns holding the fan up to the joists and measuring. When we discussed which way the duct would go, I was holding the fan and looking down at the underside of it. I failed to remember that when the fan was mounted, that would be the bottom of the fan and not the top (as it was currently positioned in my hands). The duct would come out of the opposite side of the box when it was flipped over. So our wooden box we made was completely wrong for mounting the fan the correct way. In fact, when the fan was turned the right way, it required much less work.

Everybody makes mistakes, but I still felt horrible. We had literally wasted an hour and a half of our Saturday morning building this solution that we did not need. It was completely my fault for not remembering to flip the fan over. After we realized my mistake, Peter commented that he had thought we would be attaching it to the other joist, but he didn’t question it when I told him we would need to mount it on the joist for which we built the contraption.

Peter demolished what he had just built (that part went pretty quickly and was possibly therapeutic) and we set to work figuring out what we actually needed. To mount it on the other side, we just needed to attach a piece of plywood inside the flanges of the I-beam joist, and then attach another board to the joist to get the fan closer to the center of the room (this was SO much faster than what we had already done). We had some leftover plywood already cut to fit inside the joist, from when we did our joist repair, so that was easy. Then we found a piece of scrap exterior trim to attach to the joist. It wasn’t quite as thick as what we needed, but it was readily available, and after the frustration we had just experienced, we decided it was good enough.

So when you come to visit our house after the drywall is up and you notice that the fan in the half bathroom is a little off-center in the room, maybe just keep it to yourself.

IMG_5954

The correct version.

A Trip to the Strange World of IKEA

We aren’t ready to purchase our kitchen cabinets yet, but we wanted to fine tune our kitchen design and see the cabinets in person. We are planning to buy IKEA cabinets and install them ourselves. Of course, the installation will be frustrating, but who doesn’t love some extra frustration between spouses?

IMG_5270

We didn’t plan to spend 5 hours in the store. It just sort of happened. Maybe it was because we left the boys with my parents. For future reference, we noted that IKEA has a supervised play area where they will let you leave your children for an hour for free.

IMG_0862

We probably spent an hour of the day eating. First, we had second breakfast. It was only 99 cents (so how could we go wrong?), it was enough to split, and they had free coffee, which is the only kind I drink.

IMG_5271

Okay, the cinnamon bun cost extra, but the plate of food was only $.99.

For lunch, I somehow missed ordering Swedish meatballs and ended up with salmon and funny potato cakes and salad and dessert (Amanda got chicken fingers). Still cheap, except the dessert.

IMG_5276

On our way back to the car, we got soft-serve ice cream cones, buy-one-get-one-free (not pictured).

Oh, and they have a tiny mini Swedish grocery mart too, which we didn’t realize at first. Many of the same food oddities they sell in the cafe are available in frozen form, but we didn’t buy any. About half of them seemed to involve lingonberries, and roughly the other half were comprised of various varieties of herring.

IMG_5278

Another 2 hours were spent sitting at a computer fiddling with our kitchen design. I guess that’s what we came there to do, but I had brought with me the mostly mistaken notion that by visiting the actual store, we would get some actual help / advice from actual salespeople. Instead, the store extends the self-service mantra to kitchen design by way of a large bank of computers, each of which is pointed at the same somewhat glitchy 3D design website you can access from the comfort of your own home.

IMG_5272

The view from our workstation.

Our home computer is 7 years old, so there were definite advantages to using the newer in-store models. And it was nice to be able to jump up and go look at something in person when we had a question. Is the bottom drawer of a three-drawer front panel the same height as the bottom drawer of a two-drawer front panel? (Yes.) How big is a microwave? (We brought a tape measure and they provide paper ones.) What would it really look like to have the refrigerator between two tall cabinets? (Not bad, if there’s enough width.)

IMG_5274

Sample kitchen.

We did manage to have a couple brief conversations with one salesman. We had built up a long list of questions, so once we had him there, we were barreling through them. After answering two or three, he walked away, leaving us wondering what we had said wrong. To his credit, he came back a few moments later and said, “I’m sorry, I didn’t ask if you had any more questions,” and then he patiently answered the rest of them.

When it was time to eat lunch, we tried to print some views of our design, along with a shopping list. (One of the nice features of the 3D site is that, if you can get it to stop putting cabinets in sideways, it will print you a list of every door panel, screw, and widget that you need to purchase in order to assemble your masterpiece.) But nothing came out of the printer. We eventually found our helpful salesman and caused him to be even more harried by forcing him to remove the printer and shake it.

IMG_5273

I think he was this close to reenacting the printer scene (warning: language).

I guess we spent the rest of the time looking around, mostly at kitchens but also at other mock rooms. And, of course, despite not having the boys along (or perhaps because they weren’t there), we spent some time looking at toys. How can you go wrong with a wooden train set for ten dollars?

Ridiculously cheap food, an hour of free childcare, slow-close drawers, classic toys, and a maze-like environment (look for the signed shortcuts if you go!)… Our overall impression of Ikea is that it is a somewhat weird place. But so is the Pink House.

IMG_0861

Don’t pee in the display potties!

Waste Is a Terrible Thing To Mind

My dad knows how to do a lot of things and did all of our plumbing for us when we put in our half bathroom. In order to make the best use of his time, though, we decided we shouldn’t rely on his expertise for everything (electrical, plumbing, and HVAC). We took plumbing off his plate.

There are two separate parts to plumbing: the waste lines and the supply lines. As one might assume, the waste lines are what carry away the waste water, and the supply lines supply the fixtures with water. Several people told us that installing supply lines is much easier than waste lines. We decided we would give the supply lines a try ourselves and only hired a plumber to do the waste lines.

IMG_4696

I put notes everywhere about what we wanted done. I’m guessing a real general contractor would have had plans for the plumber or something professional like that.

The plumbers thought it would take about two days to do the job. It took three and a half. Jonah was super excited to have them here. I think he was expecting them to be like our carpenters had been, happy to listen to him talk for a little bit. They weren’t quite as enthusiastic as he was hoping, but they did seem amused when he excitedly told them, “I love the pipes you put in! They’re so squiggly!”

IMG_4691

Squiggly pipes.

The afternoon of the first day, they were met with a roadblock. They couldn’t put in a waste line for the master toilet because there was a joist right underneath where it needed to go. Their supervisor came and looked at it and spent an hour on the phone with a plumbing supply house discussing various options and different types of toilets that might be able to be installed in a slightly different position. None of those would work, though, and they determined that the only option would be for us to “head off the joist” (or “header off the joist,” depending on who you ask). When they left that day, they said to call them when we had it done and they would come back to finish.

The area in question.

The area in question: Before.

Our contractor was already done with their part, but we weren’t confident in our ability to take on the task of cutting out part of the joist without making the floor above collapse. We emailed the contractor to see if they could do it. They said that they would. We were expecting to have to pay them more money, but they did it as “warranty work.” Yay!

The next week, our lead carpenter came and spent a morning heading off the joist. This basically meant cutting out the piece of joist that was in the way, and creating a box around that area to support the rest of the joist. I’m really glad that we had a skilled carpenter do that instead of attempting it ourselves.

IMG_4798

During.

IMG_4956

After.

We let the plumber know that the joist work was completed and they said they would come the next week. They were delayed for various reasons and finally came back almost two weeks after the first day they worked. There was only one plumber this time and it took him another two and a half days to finish. They will have to come back again to charge the system before our rough-in inspection from the city, and then again to connect a few things after the inspection.

IMG_5055

Waste lines.

After watching the plumber work on the waste lines, I was glad that we didn’t try to take on that task ourselves. Installing waste lines seems to require a lot more knowledge than Peter and I have about such things, so it was $3500 well spent. It’s neat to see all of the pipes, and I feel like I understand more about plumbing and plumbing vents now that I can see the pipes and how they are all connected. Not that I am offering to help with anyone’s plumbing projects.

IMG_5056

Vent pipes in the ceiling.

If you come over, Jonah would be happy to give you a tour of the new pipes (although some of his initial excitement has worn off). He will likely point out the “big, scary pipe” (the 4-inch one) and tell you that the reason it is so big is because it has to be big enough for poop. So if you don’t want to hear about that, don’t mention the pipes.

Being a General Contractor

If I told you that I am a general contractor, you probably wouldn’t believe me. It’s true that I am not a licensed general contractor, but for our big addition project, Peter and I are technically the general contractor. We ended up in this position mostly because we wanted to do some of the work ourselves. Our (licensed) contractor was concerned about how to have a contract with us in which they would do some of the work and then we would do some of the work and then they would do more work after we were done with our part. So we all decided that the best route would be for the two of us to be the general contractor.

Dictionary.com defines a general contractor as “a person who contracts for and assumes responsibility for completing a construction project and hires, supervises, and pays all subcontractors.” This is what we’ve been doing. We hired our contractor (technically as a subcontractor, since we’re the contractor) to build the structure, and that’s where our contract with them ended. Then it’s up to us to finish the job. We have hired ourselves for some parts and will continue to do so: electrical, part of the plumbing, HVAC, insulation, interior painting, flooring, and maybe a few other things. We used professional subcontractors for the roof, gutters, and part of the plumbing, and intend to hire someone for the drywall and the doors/trim. Our contractor adds a 20% fee to all costs they incur, including the cost of any subcontractors, so by coordinating the subcontractors ourselves, we save that 20%.

Despite not always knowing quite what we’re doing, it’s a nice arrangement, because we have more control over each step of the process and can move at our own pace. On the parts that we are doing ourselves, we have been able to make changes along the way. For example, we decided to move the refrigerator over, so we’ll just rearrange some outlets we put in without having to call an electrician to come back (and pay more money).

IMG_5099

Sorry outlets, you have to move.

There is definitely some effort involved in our main task of arranging the subcontractors. When we were trying to decide on a roofer, we had two recommendations, one company that our contractor frequently uses (Roofer A), and one that my great-aunt had used and recommended (Roofer B). We contacted each of them, requesting free estimates. We also contacted a third roofer (Roofer C), but they never got back to us to schedule anything. Roofer A came after a few days and looked at it. They gave us a quote but stated that they probably wouldn’t be able to get to it for at least 6-8 weeks. They also frustrated me in my communications with them. Roofer B took a bit longer to actually come and produce a quote, and the quote was $600 more than Roofer A, but they said they could come in about 2 weeks, and they didn’t frustrate me the way Roofer A did. We were having some leaks, so we decided it was worth the extra money to get the roof sooner and went with Roofer B. I asked Roofer B if they would be willing to match the lower price of Roofer A, and they met me halfway, reducing their price by $300.

While it was hard to spend almost $12,000 on a roof, it was nice knowing that by coordinating it myself, we saved almost $2400 by not having to pay the contractor’s additional 20% fee.

Similarly, when we started looking for a plumber to install our waste lines for us, we contacted three companies to get free estimates. Plumbers A and B came and gave us estimates, but Plumber C said they didn’t do free estimates. (Apparent lesson: It seems that one must contact at least three subcontractors if one actually wants two estimates to compare.) The two quotes we received from Plumbers A and B were significantly different from each other, which made our choice easy. Plumber A was cheaper and is the one I most wanted to use anyway.

IMG_1231

Bonus picture from two years ago of Jonah in his new room (because this post didn’t have enough pictures).

I am definitely glad that we are acting as our own general contractor. Things would probably be moving along faster if someone else were doing it, but they would probably be annoyed at the slow pace at which we are getting our parts done. We have a goal of the end of 2015 for this project to be done, but other than that, we can continue moving at that slow pace without having to worry about anyone else.

Surprise! Here’s Your Gutter!

We knew that we wanted our new gutter and downspouts installed soon after the roof was completed, especially because of the “bathtub” part of the roof that would be spilling out a large amount of water. I met with our gutter guy to get an estimate the day after the roofers finished in late April. He pointed out that we would probably want to paint some of the trim before he put a gutter on it. Thanks. Seems obvious now, but we hadn’t thought of that.

While he put our estimate together over the next few days, we set to work figuring out how to paint some trim. That part was very stressful for Peter, and I’ll let him go into detail about it some other time. We got enough painted that we felt like it was ready for gutters toward the end of May. I called the guy to let him know, he said he was really busy, and might get to it the next week. It rained a lot that next week and he didn’t come. We assumed that because it rained a lot, he probably couldn’t do a lot of his jobs because they involve being outside on ladders. It’s sad, though, because when it rains a lot is when you really wish you had your new gutter, along with your new downspouts to channel water to pipes running under the yard.

One day in mid-June, I was out all morning. When I got home in mid-afternoon, I was surprised to see a big work van parked right in front of our house. I realized that there were people in our front yard and that their equipment was set up. Although I was not pleased that they were completely blocking the sidewalk that gets a lot of use, I was relieved to see that the van was from our gutter company and not someone who shouldn’t be there.

IMG_5014

It was frustrating to have to squeeze past on the sidewalk with all of my stuff and then with my two children, one of whom was asleep. Once we were safely inside, we watched out the windows as they finished up the job. They packed up their 11 ladders and went on their way. I have no idea how long they had been there, but they finished about half an hour after I got home.

IMG_5020

There are more ladders inside the truck!

After they were gone, I went outside and checked out our new stuff. I was happy to see that everything looked correct: three downspouts in the right places, one new gutter across the back of the house, and snow guards on the back of the roof. They theoretically put a gutter guard over the new gutter to keep out leaves, but because I am not 30 feet tall, I cannot actually see if it’s there. I’ve decided to trust that it is there.

IMG_5222

Snow guards – so huge sheets of snow don’t come sliding off the roof, which could rip our new gutter off and clobber anyone beneath.

IMG_5225

New gutter* and new downspout

IMG_5223

New downspout attached to the old roof’s built-in gutter

IMG_5021

New downspout for water from the “bathtub” area of the roof

I think they did a good job, and the price was right, but I wish they had told me they were coming. They didn’t need to get inside the house, so I guess they figured it didn’t matter if we knew they were coming, but I still think they should have given me a heads-up.

*We went with standard (“K-style”) gutters. Design/historic preservation aficionados may wonder if a half-round might have been more appropriate. To you, we say: Meh. They look cool, but this house never had half-rounds. The original part of the house still has its built-in yankee gutters, but we weren’t interested in doing that with the new roof. Part of the addition that we tore off had a K-style gutter, and the front porch does too. What’s more, K-style was way cheaper.

Happy Anniversary, Pink House!

Dear Pink House,

Today marks two years since we bought you. What a crazy two years it has been. When we decided to buy you, we planned to add on a bedroom, but we never dreamed we would be tearing part of you off first. We’ve been through a lot together during this time: carving out a new half bathroom, tearing off that new half bathroom along with the kitchen, a break-in, lots of construction noises, greatly expanding our debt, the sleep deprivation that comes with parenthood, lack of central heat and air conditioning, and lots of mosquitos. We’ve had a lot of good times, too: learning about you and learning about construction, birthday parties and gatherings, becoming reasonably good at parallel parking, and most of all enjoying your location and the ability to walk so many places.

I think it’s that last part that we were really looking for when we picked you. We wanted to be in a neighborhood where our kids could walk to school, we could walk downtown, and we could feel more connected to the community around us. We found that in you. It’s true what they say that when you’re looking for a house, what really matters is location, location, location. That is obviously the case here, since we have put a lot of money and time into making you the perfect house for us, when you were already in the perfect location (Peter would like to point out that this location was considered far from perfect, in fact downright dangerous, not that long ago). It would have been easy to find a cheaper house that already had the 3 bedrooms and 2.5 bathrooms we were wanting, but it wouldn’t have been here.

You have required so much more effort than we ever thought you would, but in the end I think it will be worth it. It helps that you’re really cute. (Coincidentally, this sounds very similar to something we say frequently about Micah.) This past winter, when we were in the middle of construction and it was cold and we didn’t have a kitchen or a washer and dryer, I unwrapped a Dove Promise and found this message inside: “You are exactly where you are supposed to be.” I have kept that wrapper because I feel like it is absolutely true for us. Pink House, I think we were meant to be.

IMG_5085

I eat a lot of chocolate.

We have loved watching you change and grow over these past two years. There is still a lot of work to be done, though, so it’s a good thing we’re planning to keep you for a while.

Happy anniversary!

Joist Repair

Let me tell you a little bit about our side trip into the exciting world of joist repair. We weren’t planning to go down this rabbit hole, but…

As you may recall, we’re doing the electrical work ourselves, with leadership from Amanda’s dad. One of the first circuits we ran, we needed to drill through eight joists above the first floor to get to the electrical panel from upstairs. Pretty much immediately after we had run the wires, we learned of our mistake. Not by anything giving way or collapsing or anything, but by finding and closely reading the instructions on “allowable hole placement” from the joist manufacturer (our contractor had sent it to us earlier that day, but we hadn’t looked at it yet). Guess where we had drilled for the wires? Not in an allowable location.

IMG_4590

Oops.

The joists are like wooden I-beams, with a thin web (the vertical part of the I) made of very dense plywood and a wooden flange on the top and bottom (the horizontal parts of the I). For the most part, they span from one exterior wall to the other, although some span only midway to a structural wall. In the middle of any span, you can put some pretty large holes in the web – large enough to run a toilet drain line, for example. But near those load-bearing walls, or bearing points, there aren’t many locations where holes are allowed. And right over the exterior wall, you’re not supposed to put any holes.

Our holes were right over the wall.

What followed was a process of contacting the joist manufacturer and taking measurements of span length for each joist and precisely how high above the bottom flange each hole was located. I was impressed with their customer service: they plugged our specific numbers into their engineering models. Ultimately, they recommended repairing 7 of the 8 joists by attaching additional boards to the face of the joist in the area of each hole. We could have notched the repair boards to keep the wires where they were, but we chose instead to pull the wires out and relocate them past the repairs.

IMG_4582

This was not as easy as it sounds, but it was made a bit easier by getting to borrow our contractor’s table saw, nail gun, and air compressor (we were glad we squeezed this project in during the last weekend before they were done and took their tools with them). Each of the 7 repaired joists required 24 nails, and neither of us can swing a hammer particularly well, especially when the hammer must be swung in a confined space, at an awkward angle, overhead. Plus, the nail gun was way more fun.

Thankfully, in our basement was some leftover rim board (a wide board about an inch thick typically used at the ends of joists to transfer the load to the wall). There turned out to be just enough for us to use. We bought some plywood and set to work cutting everything to the appropriate size. Each repair needed two pieces of plywood, glued together, that would fit inside the flange of the joist, and a piece of rim board, glued to the plywood, that would cover the plywood and attach to the flange.

IMG_4584

Exhibit A

Amanda glued together the 7 sets of wood that we needed, and I nailed them in place. It took several hours, and some of the repairs turned out a little better than others. But we got it done.

IMG_4587

We also borrowed their ladder. And a couple clamps.

IMG_4588

OK, this one only has 22 nails. Still, can you imagine hammering all those in?

We generally try to avoid doing extra work, so we were careful not to put any more holes in the restricted areas. Although it was pretty fun to use the nail gun.

IMG_4592

We also used our own new ladder. Levitation would be helpful in construction.

While we had the nail gun out, and since I had gotten the hang of using it and hadn’t been injured, we added some 2×4’s in a few places. We needed an extra board in our master bathroom so that we could nail the electrical boxes for a light and outlet in the center of the vanity. We also added some boards across our master closet in the spot where we will be mounting a rail for our closet system (if we ever get to that point). We figured we might as well add some extra support there, before there is drywall, to increase our confidence that our clothes will not come crashing down sometime in the future.

IMG_4594

Digression: As part of the emerging “sharing economy,” I think libraries should have nail guns and air compressors that patrons could check out. Books are great and all, but I won’t have time to read anything until this house gets finished. Librarians, develop some tool libraries so your citizens don’t have to buy hugely expensive tools that they would only use a couple days a year and have nowhere to store anyway. (Apologies if you run a tool-rental business, but your prices are also expensive.)